How I draw those Pictures! - Shifa Lala
My apologies to Shifa, as I'm not completely happy with this picture ... btu part of the reason for that, is I didn't draw the picture the way I normally do it, but did it differently so that I could illustrate how it all gets done.
1. First, start with a photo of your friend. (Or enemy, or stranger, or ... well, your subject!) :-)
In this case, I nabbed this off my friend Shifa Lala's MySpace page.
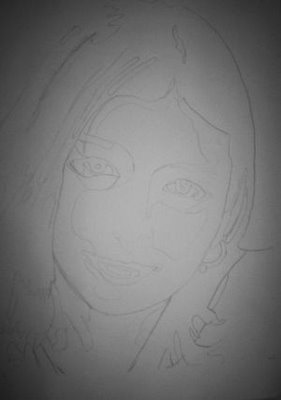
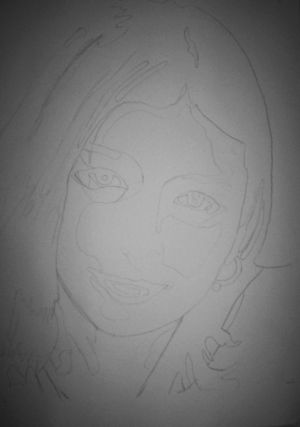
 2. Next, what I did for this tutorial, is I drew in the outlines etc. [I used a B pencil for this]. Normally, I don't do that. Normally, I just chose a spot on the page and start drawing, but if I did that, you won't be able to follow how it's done.
Some artists like to start at the eyes and work their way out (as they say it keeps the face in persepective), others start and draw left to right like they're reading and others so the outline (like I'm doing this time).
I've used all those methods before ... get used to how you like to draw and do it.
[A neat trick I sometimes do is turn the page and photo upside down so that I can concentrate on the perspective and NOT get distracted by what I think the subject looks like.]
The outline drawing below is good if you're about to do a watercolour painting. We'll leave that for another tutorial some other day.
2. Next, what I did for this tutorial, is I drew in the outlines etc. [I used a B pencil for this]. Normally, I don't do that. Normally, I just chose a spot on the page and start drawing, but if I did that, you won't be able to follow how it's done.
Some artists like to start at the eyes and work their way out (as they say it keeps the face in persepective), others start and draw left to right like they're reading and others so the outline (like I'm doing this time).
I've used all those methods before ... get used to how you like to draw and do it.
[A neat trick I sometimes do is turn the page and photo upside down so that I can concentrate on the perspective and NOT get distracted by what I think the subject looks like.]
The outline drawing below is good if you're about to do a watercolour painting. We'll leave that for another tutorial some other day.
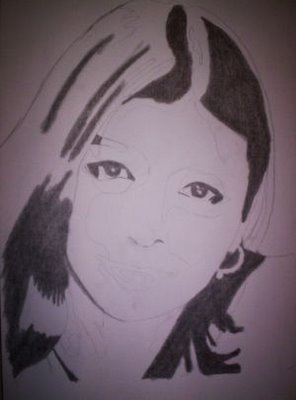
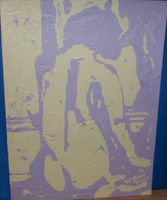
 3. Split the drawing into FIVE different shades - there is about 20% difference between the shades. That's NOT 20% from Black to White, but 20% from Darkest to Lightest shade, so if the colour of an object is light blue, then there will be five different shades of light blue to use.
The first thing I did for this, was colour all the 'SHADOW' or darkest shade in first [I used a 9B pencil for this]. Even though a lot of what I've coloured in here is actually her hair, but as her hair is black, I coloured it in the same as Shadow, though her hair is actually being hit by the light. You'll have to learn to use your judgement when you start to mess with some of the shades, and it becomes a matter of learning as you go.
3. Split the drawing into FIVE different shades - there is about 20% difference between the shades. That's NOT 20% from Black to White, but 20% from Darkest to Lightest shade, so if the colour of an object is light blue, then there will be five different shades of light blue to use.
The first thing I did for this, was colour all the 'SHADOW' or darkest shade in first [I used a 9B pencil for this]. Even though a lot of what I've coloured in here is actually her hair, but as her hair is black, I coloured it in the same as Shadow, though her hair is actually being hit by the light. You'll have to learn to use your judgement when you start to mess with some of the shades, and it becomes a matter of learning as you go.
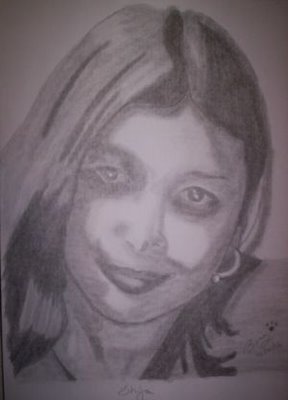
 4. I then coloured in all the 'MID-TONE' and 'Reflected Light in Shadow'. [I used a 6B pencil for this]. This consisted of most of Shifa's flesh and anything being hit by some light which is in shadow (such as around the nose and eyes etc). The 'DIRECT LIGHT/Highlight' I just left white.
I also took the opportunity to correct some of the lines I originally drew. (If you look at the first drawing and then this one, you'll see some things moved a little - you'll also noticed I mesed up Shifa's mouth, which is why her lovely smile doesn't look right! WAAAH! I made the upper lip too thick along with getting the shading incorrect! My apologies Shifa!)
4. I then coloured in all the 'MID-TONE' and 'Reflected Light in Shadow'. [I used a 6B pencil for this]. This consisted of most of Shifa's flesh and anything being hit by some light which is in shadow (such as around the nose and eyes etc). The 'DIRECT LIGHT/Highlight' I just left white.
I also took the opportunity to correct some of the lines I originally drew. (If you look at the first drawing and then this one, you'll see some things moved a little - you'll also noticed I mesed up Shifa's mouth, which is why her lovely smile doesn't look right! WAAAH! I made the upper lip too thick along with getting the shading incorrect! My apologies Shifa!)
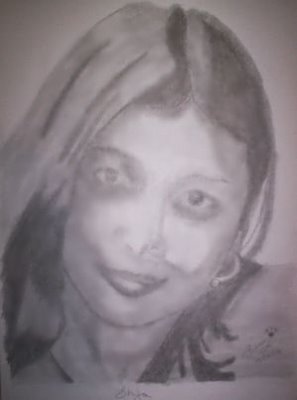
 5. Last stage, Fifth colour is the 'Reflected Light' which goes over the mid-tone shade. I didn't actually use any pencil for this stage, I just smudged mid-tone into the 'Direct Light / Highlight' shade. (White was white anyway). Sometimes I do use pencils for it as well. Normally the highlights aren't as common as this, but there is a lot of light in the photo. Those little white specks in her eyes are highlights (in case you didn't realise) and sometimes, a picture might only have those and one across the top of the nose or something. It's a matter of judgement - so you could do this exact same picture and make different choices on what you decide to be mid-tone or highlight or reflected light etc ... you can even change the names of the shades, as I often do as well.
I also went through the drawing smudging everything with a piece of paper and my finger. Where needed, I added more carbon from the pencils to make things darker, or to just re-inforce a line which was getting lost. We don't have to do the smudging (and the picture will stand as a good pencil drawing), but I find the smudging between tones makes it more realistic and it's really a painting type technique as well. (Yeah, a lot of artists use their finger to smudge as well. I remember reading some where that Leonardo's finger print is incorportated into the Mona Lisa ... not sure if it is a real fact, but I know from looking at a lot of art, you can often see artists fingerprints in their works.)
5. Last stage, Fifth colour is the 'Reflected Light' which goes over the mid-tone shade. I didn't actually use any pencil for this stage, I just smudged mid-tone into the 'Direct Light / Highlight' shade. (White was white anyway). Sometimes I do use pencils for it as well. Normally the highlights aren't as common as this, but there is a lot of light in the photo. Those little white specks in her eyes are highlights (in case you didn't realise) and sometimes, a picture might only have those and one across the top of the nose or something. It's a matter of judgement - so you could do this exact same picture and make different choices on what you decide to be mid-tone or highlight or reflected light etc ... you can even change the names of the shades, as I often do as well.
I also went through the drawing smudging everything with a piece of paper and my finger. Where needed, I added more carbon from the pencils to make things darker, or to just re-inforce a line which was getting lost. We don't have to do the smudging (and the picture will stand as a good pencil drawing), but I find the smudging between tones makes it more realistic and it's really a painting type technique as well. (Yeah, a lot of artists use their finger to smudge as well. I remember reading some where that Leonardo's finger print is incorportated into the Mona Lisa ... not sure if it is a real fact, but I know from looking at a lot of art, you can often see artists fingerprints in their works.)
 So, I hope you'll all be able to go out there and draw some really good pictures.
If Shifa doesn't mind, you can use my original drawing at the top (with no shading) and practice shading in where you think the shades should go. You might even be able to get her smile right (Hey, Shifa, have a go yourself). You might even be able to do better than me.
The TWO main things to aim to get right in drawing is
1. PERSPECTIVE / WHERE EVERYTHING IS, and
2. THE SHADING.
Actually, the more I look at the picture, the more I can see what I did wrong (like the end of the nose was right to begin with, but looks wrong once you get to the end! Waaah!)
A good source for models for pictures are all those famous 'Rock 'n' Roll' stars and actors/models etc. A lot of them have black and white photos of themselves, which makes it easy to divide up the different tones etc.
Anyway, go forth and have some fun drawing, and I hope you can impress your friends with your amazing abilities.
So, I hope you'll all be able to go out there and draw some really good pictures.
If Shifa doesn't mind, you can use my original drawing at the top (with no shading) and practice shading in where you think the shades should go. You might even be able to get her smile right (Hey, Shifa, have a go yourself). You might even be able to do better than me.
The TWO main things to aim to get right in drawing is
1. PERSPECTIVE / WHERE EVERYTHING IS, and
2. THE SHADING.
Actually, the more I look at the picture, the more I can see what I did wrong (like the end of the nose was right to begin with, but looks wrong once you get to the end! Waaah!)
A good source for models for pictures are all those famous 'Rock 'n' Roll' stars and actors/models etc. A lot of them have black and white photos of themselves, which makes it easy to divide up the different tones etc.
Anyway, go forth and have some fun drawing, and I hope you can impress your friends with your amazing abilities.
 2. Next, what I did for this tutorial, is I drew in the outlines etc. [I used a B pencil for this]. Normally, I don't do that. Normally, I just chose a spot on the page and start drawing, but if I did that, you won't be able to follow how it's done.
Some artists like to start at the eyes and work their way out (as they say it keeps the face in persepective), others start and draw left to right like they're reading and others so the outline (like I'm doing this time).
I've used all those methods before ... get used to how you like to draw and do it.
[A neat trick I sometimes do is turn the page and photo upside down so that I can concentrate on the perspective and NOT get distracted by what I think the subject looks like.]
The outline drawing below is good if you're about to do a watercolour painting. We'll leave that for another tutorial some other day.
2. Next, what I did for this tutorial, is I drew in the outlines etc. [I used a B pencil for this]. Normally, I don't do that. Normally, I just chose a spot on the page and start drawing, but if I did that, you won't be able to follow how it's done.
Some artists like to start at the eyes and work their way out (as they say it keeps the face in persepective), others start and draw left to right like they're reading and others so the outline (like I'm doing this time).
I've used all those methods before ... get used to how you like to draw and do it.
[A neat trick I sometimes do is turn the page and photo upside down so that I can concentrate on the perspective and NOT get distracted by what I think the subject looks like.]
The outline drawing below is good if you're about to do a watercolour painting. We'll leave that for another tutorial some other day.
 3. Split the drawing into FIVE different shades - there is about 20% difference between the shades. That's NOT 20% from Black to White, but 20% from Darkest to Lightest shade, so if the colour of an object is light blue, then there will be five different shades of light blue to use.
The first thing I did for this, was colour all the 'SHADOW' or darkest shade in first [I used a 9B pencil for this]. Even though a lot of what I've coloured in here is actually her hair, but as her hair is black, I coloured it in the same as Shadow, though her hair is actually being hit by the light. You'll have to learn to use your judgement when you start to mess with some of the shades, and it becomes a matter of learning as you go.
3. Split the drawing into FIVE different shades - there is about 20% difference between the shades. That's NOT 20% from Black to White, but 20% from Darkest to Lightest shade, so if the colour of an object is light blue, then there will be five different shades of light blue to use.
The first thing I did for this, was colour all the 'SHADOW' or darkest shade in first [I used a 9B pencil for this]. Even though a lot of what I've coloured in here is actually her hair, but as her hair is black, I coloured it in the same as Shadow, though her hair is actually being hit by the light. You'll have to learn to use your judgement when you start to mess with some of the shades, and it becomes a matter of learning as you go.
 4. I then coloured in all the 'MID-TONE' and 'Reflected Light in Shadow'. [I used a 6B pencil for this]. This consisted of most of Shifa's flesh and anything being hit by some light which is in shadow (such as around the nose and eyes etc). The 'DIRECT LIGHT/Highlight' I just left white.
I also took the opportunity to correct some of the lines I originally drew. (If you look at the first drawing and then this one, you'll see some things moved a little - you'll also noticed I mesed up Shifa's mouth, which is why her lovely smile doesn't look right! WAAAH! I made the upper lip too thick along with getting the shading incorrect! My apologies Shifa!)
4. I then coloured in all the 'MID-TONE' and 'Reflected Light in Shadow'. [I used a 6B pencil for this]. This consisted of most of Shifa's flesh and anything being hit by some light which is in shadow (such as around the nose and eyes etc). The 'DIRECT LIGHT/Highlight' I just left white.
I also took the opportunity to correct some of the lines I originally drew. (If you look at the first drawing and then this one, you'll see some things moved a little - you'll also noticed I mesed up Shifa's mouth, which is why her lovely smile doesn't look right! WAAAH! I made the upper lip too thick along with getting the shading incorrect! My apologies Shifa!)
 5. Last stage, Fifth colour is the 'Reflected Light' which goes over the mid-tone shade. I didn't actually use any pencil for this stage, I just smudged mid-tone into the 'Direct Light / Highlight' shade. (White was white anyway). Sometimes I do use pencils for it as well. Normally the highlights aren't as common as this, but there is a lot of light in the photo. Those little white specks in her eyes are highlights (in case you didn't realise) and sometimes, a picture might only have those and one across the top of the nose or something. It's a matter of judgement - so you could do this exact same picture and make different choices on what you decide to be mid-tone or highlight or reflected light etc ... you can even change the names of the shades, as I often do as well.
I also went through the drawing smudging everything with a piece of paper and my finger. Where needed, I added more carbon from the pencils to make things darker, or to just re-inforce a line which was getting lost. We don't have to do the smudging (and the picture will stand as a good pencil drawing), but I find the smudging between tones makes it more realistic and it's really a painting type technique as well. (Yeah, a lot of artists use their finger to smudge as well. I remember reading some where that Leonardo's finger print is incorportated into the Mona Lisa ... not sure if it is a real fact, but I know from looking at a lot of art, you can often see artists fingerprints in their works.)
5. Last stage, Fifth colour is the 'Reflected Light' which goes over the mid-tone shade. I didn't actually use any pencil for this stage, I just smudged mid-tone into the 'Direct Light / Highlight' shade. (White was white anyway). Sometimes I do use pencils for it as well. Normally the highlights aren't as common as this, but there is a lot of light in the photo. Those little white specks in her eyes are highlights (in case you didn't realise) and sometimes, a picture might only have those and one across the top of the nose or something. It's a matter of judgement - so you could do this exact same picture and make different choices on what you decide to be mid-tone or highlight or reflected light etc ... you can even change the names of the shades, as I often do as well.
I also went through the drawing smudging everything with a piece of paper and my finger. Where needed, I added more carbon from the pencils to make things darker, or to just re-inforce a line which was getting lost. We don't have to do the smudging (and the picture will stand as a good pencil drawing), but I find the smudging between tones makes it more realistic and it's really a painting type technique as well. (Yeah, a lot of artists use their finger to smudge as well. I remember reading some where that Leonardo's finger print is incorportated into the Mona Lisa ... not sure if it is a real fact, but I know from looking at a lot of art, you can often see artists fingerprints in their works.)
 So, I hope you'll all be able to go out there and draw some really good pictures.
If Shifa doesn't mind, you can use my original drawing at the top (with no shading) and practice shading in where you think the shades should go. You might even be able to get her smile right (Hey, Shifa, have a go yourself). You might even be able to do better than me.
The TWO main things to aim to get right in drawing is
1. PERSPECTIVE / WHERE EVERYTHING IS, and
2. THE SHADING.
Actually, the more I look at the picture, the more I can see what I did wrong (like the end of the nose was right to begin with, but looks wrong once you get to the end! Waaah!)
A good source for models for pictures are all those famous 'Rock 'n' Roll' stars and actors/models etc. A lot of them have black and white photos of themselves, which makes it easy to divide up the different tones etc.
Anyway, go forth and have some fun drawing, and I hope you can impress your friends with your amazing abilities.
So, I hope you'll all be able to go out there and draw some really good pictures.
If Shifa doesn't mind, you can use my original drawing at the top (with no shading) and practice shading in where you think the shades should go. You might even be able to get her smile right (Hey, Shifa, have a go yourself). You might even be able to do better than me.
The TWO main things to aim to get right in drawing is
1. PERSPECTIVE / WHERE EVERYTHING IS, and
2. THE SHADING.
Actually, the more I look at the picture, the more I can see what I did wrong (like the end of the nose was right to begin with, but looks wrong once you get to the end! Waaah!)
A good source for models for pictures are all those famous 'Rock 'n' Roll' stars and actors/models etc. A lot of them have black and white photos of themselves, which makes it easy to divide up the different tones etc.
Anyway, go forth and have some fun drawing, and I hope you can impress your friends with your amazing abilities.
posted by Dabido @ 1/14/2006 11:19:00 am
![]()
![]()


<< Home